


Malware analysis is an essential part of security researcher’s work. But working with malicious samples can be dangerous — it requires specialized tools to record their activity, and a secure environment to prevent unintended damage.
However, manual lab setup and configuration can prove to be a laborious and time-consuming process.
In this article, we’ll look at 4 ways to create a reverse engineering lab, discuss how to save time, and, potentially, improve the detection rate using a cloud service, and a recommended list of tools for a comprehensive setup.
What is a malware analysis lab?
In essence, a malware analysis lab provides a safe, isolated space for examining malware.
The setup can range from a straightforward virtual machine using VirtualBox to a more intricate network of interconnected machines and actual networking hardware.
But in this article, we’ll look at building a lab tailored for static analysis, so what we will need is a secure environment where we can run disassemblers, edit binary files and debug.
There are a couple of ways we can go about creating it:
1 — Virtualization
Perhaps the simplest way to create a secure and isolated environment is by using a virtual machine.
A popular option is Virtual Box, open-source software from Oracle. If you are on Linux, to install it, just use the command sudo apt install virtualbox. VMWare is another popular choice — it’s a commercial program, but there is a free tier.
Set up is easy — download and install the software, create a virtual machine, configure the settings to make sure it doesn’t have network access or shared folders with the host, and then boot it with an .ISO file of your chosen operating system.
But this approach has some drawbacks: you will have to establish custom detection rules for identifying suspicious or malicious entities, independently research emerging techniques, maintain configurations, and determine logging policies using available tools. This increased focus on maintenance and configuration detracts from the time spent on analysis.
Pros
Free or available at a low cost
The setup is easy
Provides an isolated environment if configured correctly
Cons
The performance takes a hit
Limited scalability bottlenecked by your CPU
The malware could escape to the host
Requires to manually configure detection rules
2 — Dedicated hardware
In case you have an old laptop lying around or you have the means to get one or build a PC, this is definitely an option. You don’t have to break the bank either — the 11-13th generation of Intel processors make even budget machines more than a viable option.
The main upside of opting for a physical computer is better performance and higher security since you can make sure the machine is truly isolated from all devices and networks.
Pros:
Most performant option
Completely isolated environment
Can be endlessly customized
Cons:
High-end hardware is pricey
Requires software and hardware maintenance
Needs to be configured to work
3 — A cloud lab
Creating a malware lab in the cloud actually isn’t as difficult as it might sound. Also — it is free! All you need is an account at AWS, or any comparable cloud service provider, and a machine to connect to it. The setup may be slightly more complicated than a local virtual machine, but there are numerous tutorials that you can use as a guide.
If you choose to work with AWSs, look for Kali in the marketplace to set up a Kali Linux Virtual Machine. To use the GUI, you can create a VNC server and connect to your lab with a tool like VNC Viewer.
One of the downsides of this approach is that it’s free until it isn’t. If you exceed the boundaries of the free tier, your cloud bill could balloon quickly.
Occasionally, cloud providers may also restrict malware execution, posing legal risks. Additionally, cloud machines demand support, burdening IT operations. While suitable for novice independent researchers, this approach presents drawbacks in corporate settings. Crucially, it lacks the ability to counteract malware’s VM detection and bypass anti-evasion tactics.
Pros:
Scalability
No hardware maintenance
Isolated from your network for better security
Cons:
Potential legal risks.
Difficult setup
Needs to be configured to work
Latency decreases the quality of work
Advanced setups are pricey
Susceptible to anti-avastin techniques
4 — Sandbox-as-a-Service
One significant advantage of cloud-based sandbox services is their built-in resilience against VM detection. This reduces the likelihood of a malware sample recognizing it’s in a virtual machine and halting its execution, a feature that requires manual configuration in other sandboxes.
Also, in a service like this, detection rules are written by specialists utilizing vast malware and threat intel databases. As a result, the software can enrich analysis outcomes with techniques and IOCs, yielding more comprehensive output compared to raw data from cloud or on-prem VMs.
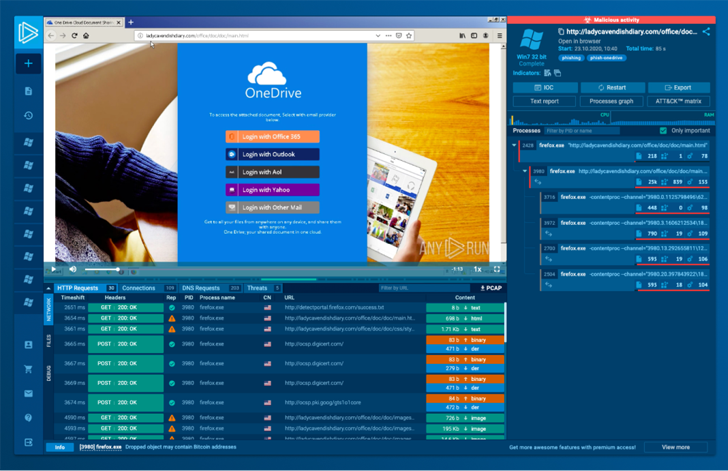
Furthermore, cloud-based sandbox services streamline environment configurations. For instance, instead of creating separate snapshots in a VM, ANY.RUN’s cloud service allows easy environment setup through a user-friendly menu every time a lab is initiated.
Pros
Saves time
Ease of use
Secure and completely isolated from your network
Hardened against VM detection
Simple configuration of the execution environment
Cons
Isn’t optimized to work with your toolset
Certain solutions on the market may be laggy
Virtual machine instances are time-constrained
Using an online, interactive sandbox such as ANY.RUN instead of a lab offers convenience and speed. It can help automate parts of static analysis, like extracting malware configurations.
If you’d like to try ANY.RUN for yourself, they are currently running a special promo for Hacker News readers:
Types of software for reverse engineering
Here are some essential tools that will help to you reverse-engineer malware:
Disassemblers. Disassemblers are a must-have for reverse engineering. They allow you to transform machine language into assembly code that’s easy for humans to understand, so you can gain insight into how malware functions. IDA Pro, Ghidra, and Binary Ninja are all popular disassemblers. To run Ghidra on Linux, first, install JDK and download Ghidra itself to your machine. No installation is needed, just execute these commands inside the Ghidra directory: chmod +x ghirdRun and ./ghirdaRun.
Decompilers. Decompilers are similar to disassemblers, in that they can convert machine code into source code. It can be useful for understanding the malware’s architecture and figuring out specific functions or modules. Popular decompilers include IDA Pro, Ghidra, and Hex-Rays.
Debuggers. Debuggers help programmers locate errors and troubleshoot them by letting them go through the code line by line, set breakpoints, and observe the way the malware functions. Several of the most commonly used debuggers are OllyDbg, x64dbg, and WinDbg. x64dbg is one of the most popular options right now: it’s free and available to download from x64dbg.com
HEX editors. Hex editors are useful for getting a closer look at binary files, understanding how they’re arranged, spotting particular values, and manipulating the file as a way of seeing how the virus responds. Common hex editors include HxD and Hex Workshop.
Network analysis tools. Certain malware requires an online connection in order to work. Network analysis programs like Wireshark can help you identify and examine the traffic sent and received by that malware.
Essential malware analysis tools
It’s up to the analyst to decide what software to install, but, in our opinion, the list of essential tools looks like this:
Detect It Easy. For determining types of files
Process Hacker. Helps you monitor system resources, debug software and detect malware
Process Monitor. A Monitoring tool for Windows that shows real-time file system, Registry, and process/thread activity
Wireshark. For analyzing network activity
x64dbg and Ghidra. Required for both static and dynamic analysis.
Oh, and if you want to get a lab that’s been pre-configured, you can use a specialized distribution kit like Remnux, which comes with most of those programs already installed.
There is also FLARE VM — a collection of software installation scripts for Windows-based systems that allows you to easily set up and maintain a reverse engineering environment on a virtual machine.
Wrapping up
We have discussed four different methods for creating an analysis lab: utilizing virtualization, building a dedicated machine, deploying a cloud lab, or subscribing to a sandbox-as-a-service.
Each of these approaches comes with its own set of benefits and drawbacks, and the correct choice depends on what you are trying to achieve and the resources available to you.
Thankfully, most of these options are totally free, so just try them all out and see what works best!
Found this article interesting? Follow us on Twitter and LinkedIn to read more exclusive content we post.
The Hacker News

